In this article, we will learn a few basic steps needed to work with the Xprinter XP-C260-L printer with a paper size of 80 mm and the principle of operation via WiFi interface. We will find out how to load paper correctly in the printer, how to enable printing or find out the IP address of the printer, which we need to have registered in our internal system to communicate properly with the device and Storyous POS application on your tablet, we will learn how to set up the printer correctly when changing routers and IP addresses, possibly after a reset.
If your printer doesn't print, you can find common problems and solutions here.


How to insert paper
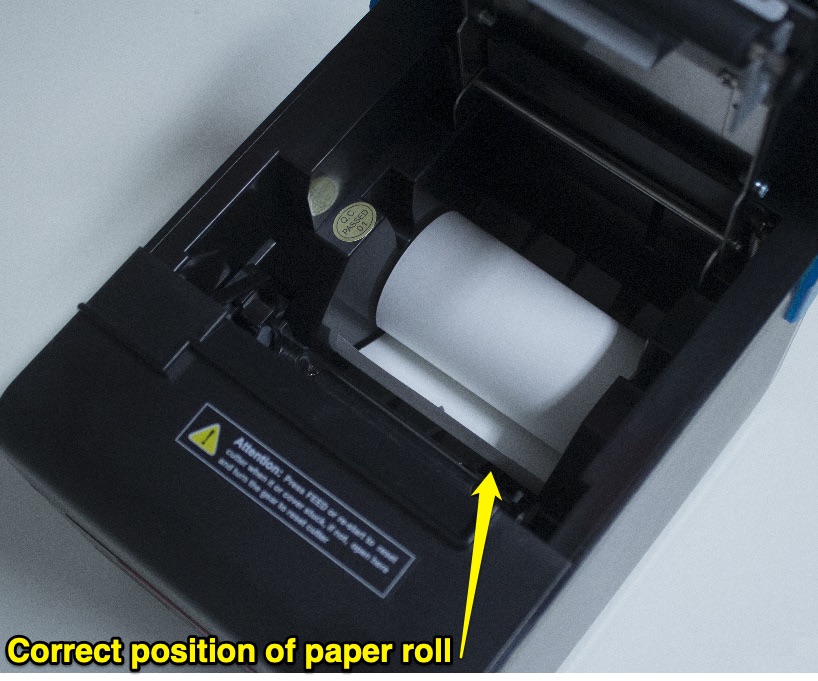
We recommend ordering from us, we offer only quality thermal paper made in Germany. Open the top of the printer and insert the paper roll into the printer so that the paper unwinds upward as shown. If you run out of paper, the red indicator on the front of the printer will light up.

Connection through USB cable
If you have our fourteen-inch cash register in your company, you can connect the printer to it using a USB cable. However, it is necessary to make a change in our internal system, so to connect via USB, contact us at the customer support email pomoc@storyous.com or at +420 602 405 047.
Self-test
Self-test is a ticket with data about your device. To print it, proceed as follows:
1. Check if your printer is plugged in. Turn OFF.
2. While printer is OFF press and hold FEED button (big round on the front).
3. Hold this button and turn ON the printer, after turning on it is necessary to hold button for 5 seconds (if you will hold the FEED button longer than 20 seconds, printer will reset and should be set with LAN cable and PC!). After it printer will print long receipt with technical details about device - self-test. We need 3 details - IP Address, Subnet Mask and Gateway.
Setting LAN printer for printing
In some cases, you may need to change your modem or router. In this case, it is necessary to reset the printer, and then set it to a new router.
To reset, turn OFF the printer, hold the FEED front button, and turn on the printer. Don't let go the FEED button! Wait for about 20 seconds by holding down the button. If you see that the front panel has flashed twice, you can release FEED.
Please continue according to the following video tutorial (the video also contains a track of subtitles):
1. Connect printer to PC with LAN cable
2. Menu START -> Settings -> Network & Internet -> Ethernet -> Properties -> Choose protocol IPversion4 (TCP/IPv4) -> Double click -> Use the following IP Address -> Insert following numbers:
IP Address: 192 . 168 . 1 . 55
Subnet Mask: 255 . 255 . 255 . 0
Default Gateway: 192 . 168 . 123 . 1 -> OK -> Close
3. Open Internet browser -> insert 192.168.123.100
4. Configuration -> Fixed -> Insert
Device IP Address: 192 . 168 . 1 . 55
Subnet Mask: 255 . 255 . 255 . 0
Gateway Address: 192 . 168 . 1 . 1 -> Save -> OK -> Restart - OK
Fixing IP address
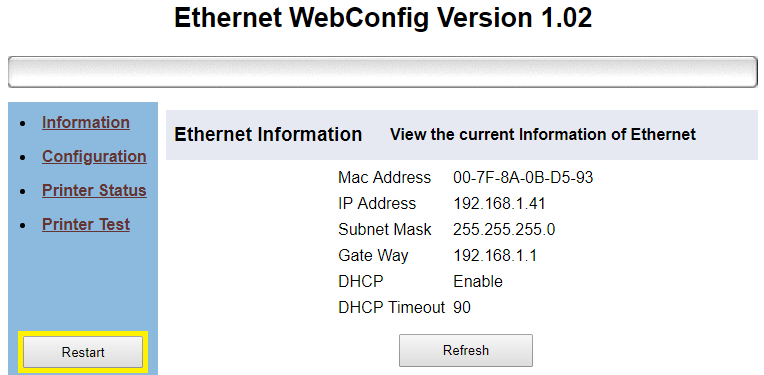
1. Make sure you are connected to the WiFi network on your tablet or computer, which is broadcast by the router connected to the printer. Print an informational self-test from the printer according to the instructions in the previous paragraph. Then leave the printer on.
2. On your tablet or computer, open the Google Chrome web browser and type the IP address from the self-test (in the format of four numbers separated by dots) in the address bar where the page addresses are written. You will be taken to the interface of your printer.

If you change your old router to a new one, before moving the printer, you need to change the IP address setting back to DHCP in the Configuration option in the printer interface menu, otherwise the device will not be able to be set on the new network!
Diagnostics
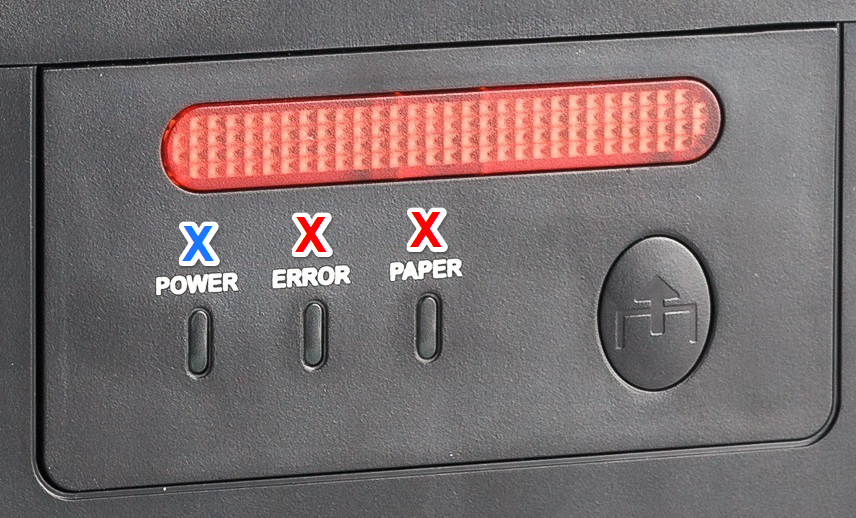
If the blue Power light on your printer is on, the device indicates that the printer is properly plugged in and that the power is on. If the Power does not light up despite plugging in the printer, please check that the power adapter is connected correctly (it consists of two parts and both need to be firmly connected).
If the red Error is blinking, it is possible that there is a problem with the automatic cutter, the print head overheating, or the paper roll is exhausted. If the Error light is blinking, try unplugging the printer for about 5-10 minutes - let it "rest".
If the red Paper light is blinking, the printer is low on paper.
