In the Places section you can set up useful features such as a daily menu, a table map or a loyalty program, or to manage users and contacts. Here you can also set up tables and their sections, which are then displayed in the application or products in your menu. You will also be able to print your company logo on your receipt or EET settings. In this article we will briefly look at all the tabs (1) you can work with in this section. If you manage multiple businesses in your administration, select a specific business from the list before you edit the features (2).
Product categories
In Product Categories you adjust how your in-app menu will appear, and then sort products for sale by their placement in your menu. See this article to learn how to set up or edit your categories correctly.
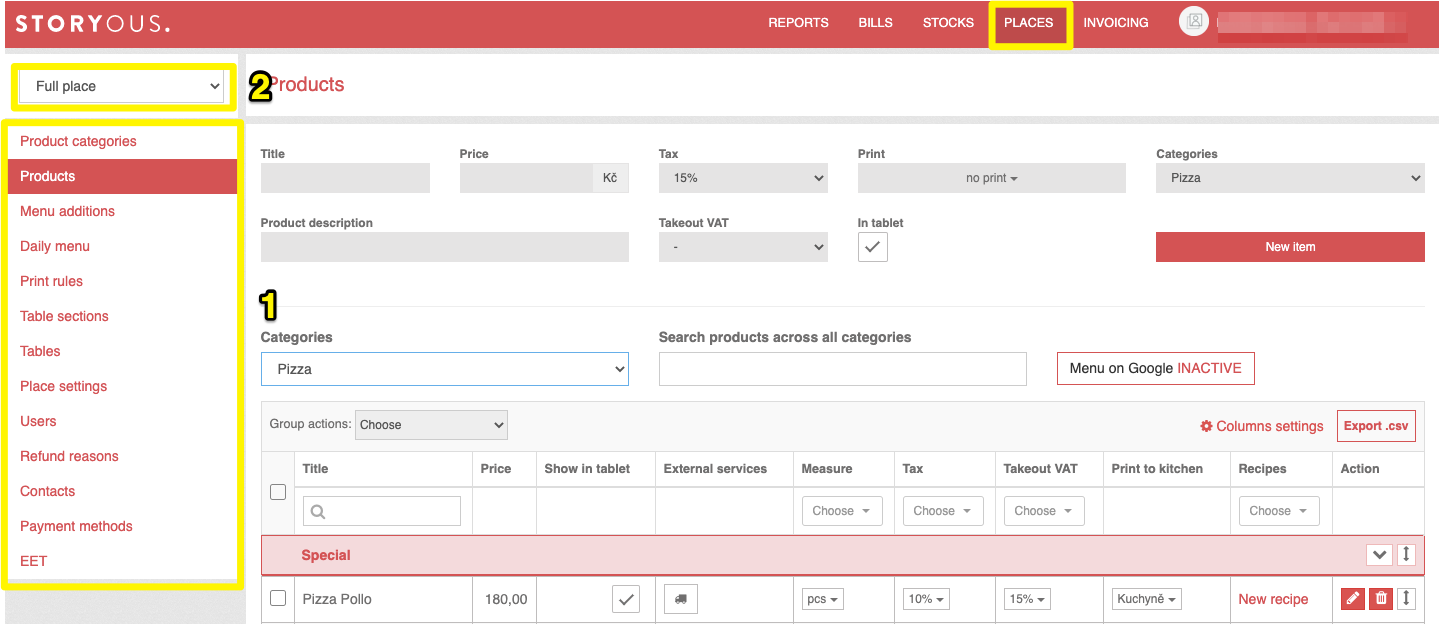
Products
To be able to mark and close accounts in Storyous POS, you must first set up individual products. In this tab you can enter everything you need, including name, VAT rate, kitchen order print or recipe, which is used to link menu items with stock cards. How to work properly with Products can be found here.
Menu additions
Using the so-called menu additions function, it is possible to add another ingredient to the finished product. This feature may come in handy in the following cases, for example: Meat preparation or adding side dish. You can find more about additions here.
Menu sets
Menu sets allow our customers to create a menu which consists of more courses, but the price is fixed for the menu (not depending on what was chosen). You can find more information about configuration of menu sets in this article. (optional)
Daily menu
Daily menu allows you to enter, for example, pre-scheduled lunches for the whole week or calmly a month in advance. You can also set the amount of food here if you know in advance that you will cook a certain number of portions. You can read about working with the Daily Menu in this article.
Print rules
The print rules are used to set up the printing of orders on different printers, depending on the part of the restaurant in which they were ordered. If the restaurant has, for example, two floors and each floor has its own bar and kitchen. If you think you could you print rules in your business, click here.
Tables section
If you have, for example, another store, terrace or garden in addition to the main area of a restaurant or a café, this tab allows you to set up a different display of tables in the application according to their location in your establishment. More info.
Tables
Here, you set up individual tables where you open accounts by marking menu items on them. You can then see the tables and accounts in the app to see the current spend on that table or how many accounts are open here. You can name your tables and set a predetermined VAT rate. How to manage tables correctly can be found here.
Map of tables
You can use the table map if you have our fourteen-inch or bigger cash register. Unlike the classic table view in the list, here you can set up a graphical display as a map exactly according to the location of each table in your company. (optional)
Place settings
In Place settings, you can upload a logo that will be printed on receipts, thank customers for visiting a message on a receipt, or print the waiter's name on it. You will also find the option to change the end of the day according to your opening hours, set foreign currency rates or print the order number for the kitchen and receipt. More info.
Users
In this tab you can manage all users in your company and their roles. For more information about managing users and the roles of each role, see this article.
Refund reasons
The reasons for canceling the receipt serve for a clear classification of canceled receipts. Learn how to set them up and learn more about why you cancel your receipt here.
Contacts
For example, if you have an invoice for parties or corporate events, your contacts will be saved here and the next invoice will automatically fill in your invoice information. In the web administration you can delete contacts or export their list including details to a .csv file.
Payment methods
In Payment Types, you enable and disable various payment options that will then appear in your app. Working with this tab is very simple and you can read all about it here.
EET
In this tab you manage settings how the system records in the Electronic Sales Register. Here you also upload the EET certificate and enter other data needed for proper registration. You can find out how to properly register or use EET modes here.